Day 5: Coding Day

  1. HTML basics
  2. Khan Academy – Intro to programming
  3. Khan Academy – CSS
  4. Python Tutorial
  5. Code.org
  6. Hour of Code
  7. Podcasts

Coding

Computer Programming – Khan Academy

Python Tutorial

Code.org

Hour of Code

Codecademy

PODCASTS

StoryCorp – Amazing podcast.

StoryCorps’ mission is to provide people of all backgrounds and beliefs with the opportunity to record, share and preserve the stories of our lives.

Day 3: Social Media Day!

To add posts, edit your blog site and your customize your blog, you will need to sign into WordPress.  When you sign into WordPress you will land on your dashboard.  The Dashboard is like a “homepage” where you can change and edit things about your blog.

Goals for today:

    1. Connect Blog to Social Media
    2. Create Gravatar
    3. Categories and Tags
    4. Going Mobile – Download App
    5. Create Youtube or Vimeo Account
      1. Set up Profile
      2. Make Playlist
      3. Link to your blog
    1. Record Interview Video for your Youtube/Blog and add to About this Blog or About Me section  (bring GoPro Cameras)
    2. Write a blog post using your phone!

1.  Connecting Your Blog

Screen Shot 2016-01-04 at 9.33.13 PM
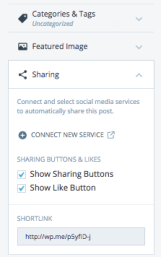
To connect your blog to your other social media, click on the sharing button on the left side of the page.  Click on the plus sign, “Connect New Service”, then follow the instructions.

2. Gravatar!

Set up your personal profile, including your Gravatar.  You do not have to use your name.  You can just use your first name and the first letter of your last name.  Also, a Gravatar does not have to be a picture of you.  It can be any picture or icon.

3.  Categories and Tags

You should always add categories and tags to every blog posts.  This way they can be easily searched and found by your readers.

  1. Please read this document describing the difference between categories and tags.
  2. Categories – General (create 2 – 6 categories for your blog).
  3. Tags (optional) – More specific, add these as you write blog posts.
  4. Once you have created some categories for your blog, go back and assign a category to your first blog post.

4. Going Mobile

Installing the WordPress App on your phone is a great way to stay connected to your blog and blog on the go!  Follow this link to add your blog to your phone.  Then, write a blog post from your phone.

    ** Optional:  Download the WordPress Computer App

5.  Create Youtube or Vimeo Account

  1. Set up Profile
  2. Make Playlist
  3. Link to your blog

6.  Interview Video

Record Interview Video for your Youtube/Blog and add to About this Blog or About Me section  (bring GoPro Cameras)

7.  Write a blog post using your PHONE!


Advanced Features

Today we will create a custom logo for your site and then create Google Form and embed it.

  1. Google Forms – Create your own form and I will show you how to embed it
  2.  Logos
  3. Coding  We will also play with code today!
    1. Hour of Code – Many different coding sites and tutorials.
    2. Khan Academy -Hard core coding.  Go straight to HTML / CSS coding!

Blogging 101

Day 1:  Welcome to blogging!

Day 2:  All About You!

Day 3:  Social Media Day

Widgets and Pictures

Adding Links

Embedding

Creating External Links for Pictures

Coding

Java – Khan Academy

Python Tutorial

Code.org


Day 2: All About YOU!

To add posts, edit your blog site and your customize your blog, you will need to sign into WordPress.  When you sign into WordPress you will land on your dashboard.  The Dashboard is like a “homepage” where you can change and edit things about your blog.

Goals for today:

  1. Delete the artificial intro post
  2. Complete “About Me” Page
  3. Professional Photo Shoot (Bring Cameras)
  4. Create Logo
  5. Create a site icon
  6. Custom Header
  7. Write another blog post!

1.  Delete Introductory Post

  1. Click on “My Sites” at the top of the page.
  2. Click on Blog Posts
  3. Select the post that you DID not write (it is probably called “My Journey”)
  4. Click on the three dots  …  and select “Trash”.

2. About Me Page

Having an “About” page is optional.  Many blogs have this page to introduce themselves to their readers.  Please do not publish your last name or where you live on your “About” page.  Try to write 2 paragraphs!  🙂

Ideas of things you can include on your “About” page:

  • What your blog will be about
  • What your interests are
  • Why you want to start blogging
  • What you hope to accomplish blogging
  • Your new head shot!

3.  Professional Photo Shoot!

4.  Create a Logo for your page.

Click here to start!

5.  Create a site icon!

Click here to read about creating a site icon!

6.  Custom Header

Click here to read about creating a custom header

7.  Write a blog post!

Day 1: Welcome to Blogging

Blog Lingo

Before you create your blog, you need to learn the lingo!  Please read this to familiarize yourself with blog lingo.  Pick one word that you are NOT familiar with to read about.  You will make a poster for your word and then present your word to the rest of the class.

  1. Blog Title (aka Site Title)
  2. Blogroll
  3. Categories
  4. Custom Domain
  5. Gravatar
  6. Header
  7. HTML Editor
  8. Pingback
  9. Publicize
  10. Shortcode
  11. Sidebar
  12. Site Logo
  13. Spam
  14. Statistics
  15. Sticky Post
  16. Tag
  17. Tagline
  18. Two-Step Authentication
  19. URL
  20. Widget

Creating Your Blog!

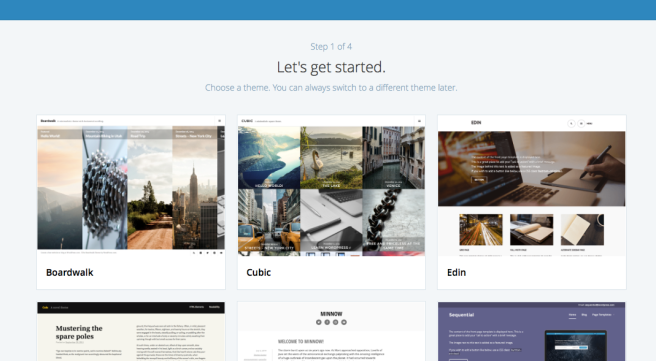
Our focus for today will be to create and personalize your blog.  Don’t worry, you can always change your theme AND your blog title later if you would like.

** You MUST read about setting up your blog here before beginning.   THEN, you may go through the steps below.

Screen Shot 2016-01-04 at 8.59.56 AM

  1. Go to WordPress.com
  2. Your Info:
    1. You will pick the FREE WordPress plan.  You can always upgrade later.
    2. Enter the email that you use the most.
    3. Pick a user name and a password.  Your user name does not have to be the suggestion.  Stop now and write down your user name and password somewhere you will not lose it.
    4. Type in your desired blog address.  If it is not available, WordPress will give you suggestions.  You can also try different variations yourself.  If you can’t decide on a creative blog address, then a great alternative is to use your name!
    5. Click the “Create Blog” and you are set!
  3. Chose a theme.  Be sure to pick a free theme.  You can customize some things on your theme.  You can change your theme later if you change your mind.
  4. Customize Theme.  If you have a picture that you would like featured at the top of your blog click on header and upload the picture.  Otherwise, skip customization for now.

Once you have finished, please fill out this form to send me your blog info!

Form link if it is not showing on your computer.

Next Steps today…

  1. Check out the WordPress Reader! You can find and follow blogs that are similar to you or are just interesting to you.
  2. Search the web for other blogs that are similar to yours.  It is a great way to get inspiration and generate ideas! Put the word “blog” in your search to help you find blogs.  If you follow any WordPress blogs, they will show up in your reader.
  3. Read more blogging tutorials that help you learn WordPress.
  4. Customizing your blog is a great way to make your blog stand out!  Spend time making your blog your own.

Next – Your first post, “About Me”

If you already have a blog and want to use it…

Already have a blog?  Be sure to fill out the form above, then read this checklist to refresh and update your blog!  Get configured (#6) walks you through customizing your blog and is a great way to give your old blog a new face!  🙂